Features at a Glance
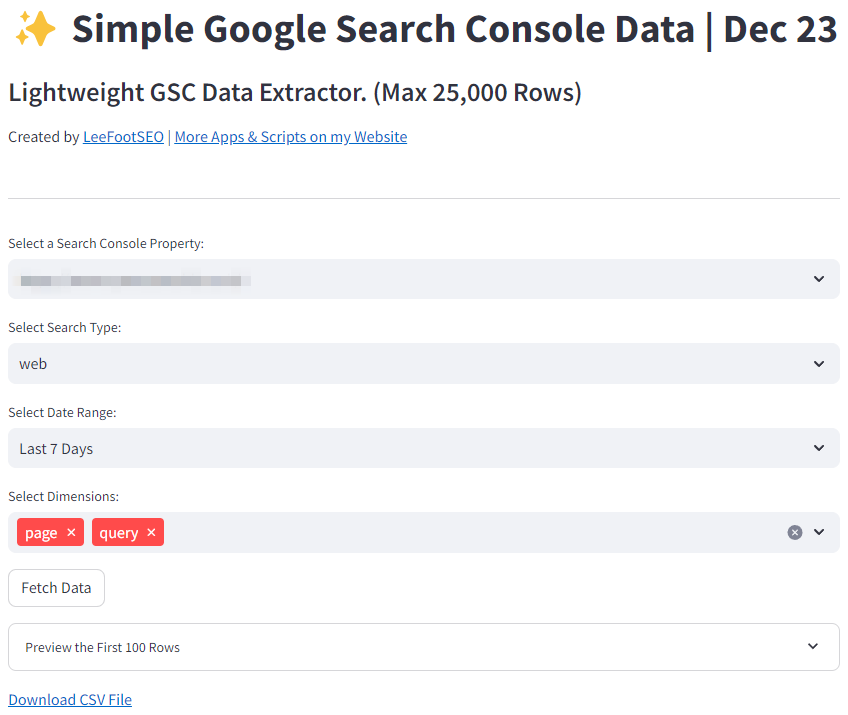
Simple to use, just log into your Search Console account and choose which property to pull the data for.
Supports the following settings and dimensions:
Select Search Type Options
- Web
- Image
- Video
- News
- Discover
- Google News
Select Date Range
- 7 Days
- 30 Days
- 3 Months
- 6 Months
- 12 Months
- 16 Months
Select Dimensions
- Page
- Query
- Country
- Date
- Device
Lightweight Streamlit Search Console App.

Simple Maintainable Code

Clean, Modular Codebase
By writing this app and releasing its source code, I aim to provide a solid foundation for new apps, especially since integrating Google Search Console data via the API can often be challenging.
Functions are grouped by utility, sorted in order they are called and adhere to the Don’t repeat yourself (DRY) and the single responsibility principle (SRP).
I’m open to pull requests too if you’d like to improve upon my work. Let’s make this the best it can be!
Spinning Up Your Own Instance of Streamlit
Setting up OAuth with Google API
- Create a Project in Google Developer Console:
- Go to Google Developer Console.
- Create a new project.
- Enable Google Search Console API:
- In the Google Developer Console, navigate to the Dashboard.
- Click on “+ ENABLE APIS AND SERVICES” and search for the “Google Search Console API”.
- Enable it for your project.
- Create OAuth Client ID Credentials:
- Go to the “Credentials” tab.
- Click on “Create credentials” and select “OAuth client ID”.
- Set up the OAuth consent screen by entering the necessary information.
- For the application type, choose “Web application”.
- Set the authorised redirect URIs. For local testing, use
http://localhost:8501, Otherwise enter the address of the Streamlit app).
- Download the JSON File:
- After creating the credentials, download the JSON file. This file contains your client ID and client secret. You’ll need to add this to the Secrets section in your Streamlit app to authenticate with Google.

Setting up Secrets in Streamlit
- Open your app and click on Manage App in the bottom right hand corner of the screen.
- Click the three dots and then choose Settings.
- Under App Settings on the left, click Secrets.
- Enter the information from the downloaded JSON file in the format shown in the image on the left.
Note: If you have just created the API access token, you may have to wait 20 minutes or so for it to start working. This is normal, so don’t give up if you’re having authentication issues after following the instructions!
Contact Me
If you need help modifying or deploying this to your organisation, drop me a message via the contact form and I’ll get straight back to you.


